Anasoft Scheduler PE User's Guide
3. Getting Familiar with the User Interface of Scheduler
Contents 5. Managing Your Schedules
4. Editing a Schedule
4.1
Adding/Editing/Deleting a Schedule
4.2 Editing Task
4.3 Editing Notice Sound
4.4 Editing Schedule
4.5 Handling Randomization
4.6 Editing Waiting Time
4.1 Adding/Editing/Deleting a Schedule
Maybe the first thing you need to do to
schedule something is
to add a schedule. When you click the "Add a Schedule" button in the
toolbar, you can start a wizard to add your new schedule. Except for a
Welcome page and a Summary Page, this wizard has 4 major pages describing the
4 major properties of a schedule - "Task", "Notice
Sound", "Schedule" and "Waiting Time". You can set
every aspect of the new schedule by configuring these properties in a suitable
way.
Pic
UG-4-1 Toolbar - The command buttons from left to right are "Add a Schedule",
"Save", "Delete Schedule", "Edit Schedule",
"Run Now", "Options", "Stop Current Sound".
After
you have finished adding a schedule, you can also edit it at any time by
double-clicking the schedule in the main schedule list. Now you can see the Edit Task dialog box. You can edit any aspect of the
schedule by setting proper values in the 4 property pages in this dialog. After
you have finished, click "OK" to save changes.
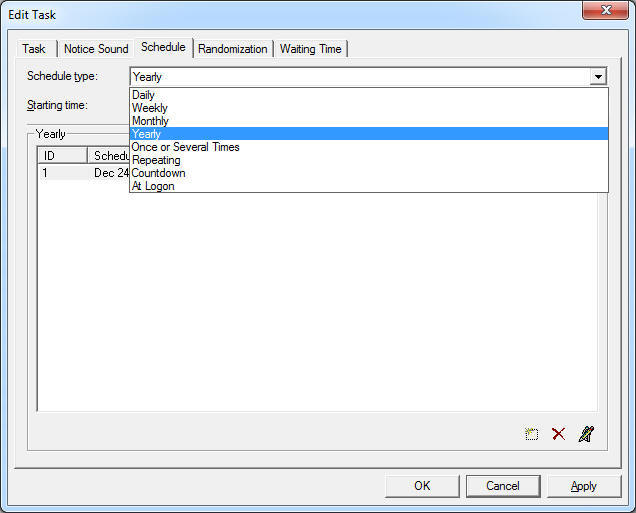
Pic
UG-4-2 Edit Task Dialog box - you can edit any aspect of a schedule here.
4.2 Editing Task
There first page of the dialog is Task page. You must set a proper schedule
Title here before you can continue.
There
are three task types:
1)
Run a program / open a file
When
you select this task type, you should set one or two path parameter in a
suitable way. Scheduler will run a program, open a file or do something else
according the parameter(s) you set. The effect will be as below:
|
First Path
|
Second Path
|
Effect
|
|
A program. (Ex: "C:\Winnt\notepad.exe") |
Blank.
|
Run this program. In this example, program "notepad.exe"
will be opened.
|
|
A program. (Ex: "C:\Winnt\notepad.exe") |
A file path.
(Ex: "D:\readme.txt") |
Run this program
specified by the first path to open this file specified by the second path. In this example, program
"notepad.exe" will run and it will open the file
"D:\readme.txt".
|
|
A file. (Ex1: "D:\readme.txt")
(Ex2: "D:\music.mp3") |
Not used.
|
The file will be opened by
the proper program for the file
type. In the first example, the text file "D:\readme.txt" will be
opened by the default editor for ".txt" file, usually this
editor is notepad.exe if no other editor was set as the editor for
".txt" files later.
In the second example, default "mp3" player will be opened to play this
mp3 file, if no mp3 player is installed in your system, nothing will
happen.
|
|
A directory. (Ex: "D:\Program Files) |
Not used.
|
Scheduler will start a new instance of Windows Explorer.
This instance of Windows Explorer will browse the specified folder - in
this example, will browse folder "D:\program files".
|
|
A web path. (Ex: "http:://www.speedy7.com") |
Not used.
|
Scheduler will start
your default web browser to visit the specified we URL
Pay attention - you must include the protocol head (such as
"http://"), or Scheduler won't recognize it as a URL. |
|
An e-mail address. (Ex: "mailto:service@speedy7.com") |
Not used.
|
Scheduler will start
you mail client program, such as Outlook Express, to starting editing a
mail and prepared to send to the email address you specified. It's same as
the effect you have already met by clicking "Contact Us" in many
web pages.
Pay attention - you must include the email head ("mailto:"),
or Scheduler won't recognize it. |
2)
Notice
You
are advised to set the text for the notice, but it's not necessary. If you just
want to listen to the notice music set in the next page, but not interested in seeing
the notice text, you may not set the notice text.
If
you set a notice text, the text will be shown in a popup message box. If no text
set, there will be no popup message box. If you just like to listen to some music,
there you should leave the text section blank.
If
you are editing a long notice, then it's suitable to open the Notice Text
Editor to edit it in a more comfortable way. You can find a button  at the right of to the notice text edit box to access the
Notice Text Editor. This built-in mini text editor supports file
open/save, general text edit operations, text/file drag and drop, and
text statistics.
at the right of to the notice text edit box to access the
Notice Text Editor. This built-in mini text editor supports file
open/save, general text edit operations, text/file drag and drop, and
text statistics.
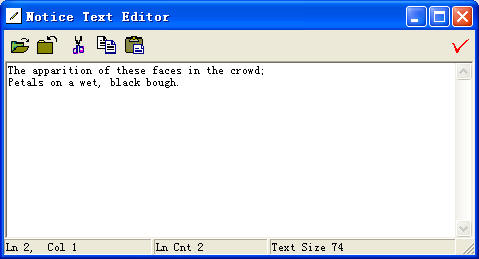
Pic
UG-4-3 Notice Text Editor - you can edit long notice text here.
3)
Special Windows Operations
There
are 5 operations under this category - Stand by / Hibernate / Shut down /
Reboot/ Log off. They are
useful if you hope to make these system management operations at specified time.
Operations:
| Operation |
Tips in using it |
| Stand by |
When you put your computer on standby, the
computer stays idle at low power status with all normal operations as
well as display output
stopped. The information in the memory is kept there and is not saved
onto the hard disk. The power is kept on. When the computer wakes up
from standby, it will instantly resume the status when the standby
starts. If the power is off for certain reasons during standby, all
information will be lost. If you connect to the Internet through dial-up
connection, dial-up connection will be disconnected when standby starts.
You will have to redial after waking up from the standby.
Standby on
Windows 98 is not stable. You should press the power button to wake the
computer up from standby. Sometimes the computer just does not wake up.
Therefore, you are not suggested to set your computer on standby on
Windows 98.
On Windows ME and 2000 or later operating systems, you can wake the
computer up by pressing a key in the keyboard and by moving the mouse. |
| Hibernate |
When
hibernation starts, Windows takes a panoramic photo of the system
status, saves it as a file on the hard disk and then shuts down the
computer. When the user opens the computer again, the system wakes up
from hibernation. It reads all information out of the saved file and
resumes the computer to the status when last hibernation starts.
Hibernation is embedded in Windows
98/Me/2000... and all later Windows versions. However, it may not be
enabled on a computer due to hardware configuration (such as when there
is not enough disk space or the file system is not supported by
hibernation, etc.), or not enabled just as the default OS setting. If
hibernation is not enabled on your computer, a hibernation operation
will just lead to a standby.
To check
whether hibernation is enabled in the operating system and to enable it
if not, please go through the following steps:
1) Open the
Control Panel and open Power Options (or Power Management).
There should be a tab called Hibernate. If you cannot find this tab,
then hibernation is not supported by your computer for certain reason
(maybe some requirements on hardware configurations are not met).
2) Switch to this Hibernate tab. There should be a check box
called Enable hibernation or something like that.
When you check it on, hibernation is enabled. When it is not checked,
hibernation is disabled. Besides, there are the sizes of the current free disk space and
the required disk space on this tab. If there is not enough disk
space, the check box may be unchecked and disabled. After you have
arranged enough disk space on your system drive, the check box will be
enabled again for you to check it.
|
| Shut down |
Shut down you computer. If you let your
computer alone doing some time-consuming job, such as recording a web-TV
program, or downloading some thing, you can let Scheduler shut down your
computer at a time you are sure that job should have finished, so both
your security and your power can be saved.
|
| Reboot |
Restart your operating system. It's useful
if you hope to do some looping operations involving restarting computer.
You should clear your user password so the system can be access to
continue loop. You can set another schedule which will run with the
schedule type "At Logon" to continue your loop. |
| Log off |
Log off current user. It's useful for if
you hope to completely exit from all current running user-level
applications, and prevent
people without an account in this computer from using it. But the public
resources in this computer can still be shared by neighbors of your
local network. |
Parameters:
1) Force exit all programs without prompt: The default choice
is true. This is useful since some programs are hard to be finished without
it. If you haven't choose it, there usually will be (sometimes may not be)
a prompt for you to react when some job haven't been finished in some
running program.
2) Prompt waiting time: This choice is useful if you are
doing some thing when the log off / reboot / shut down schedule unexpectedly
due, so you can have some time to make a choice to do it or stop it. If you
hope the job be done instantly without prompt, you can set the time
to be 0 second.
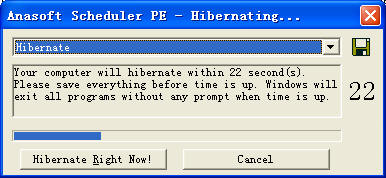
Pic
UG-4-4 Special Windows Operation Prompting dialog box
4.3 Editing Notice Sound
You can set the notice sound for a schedule by checking "Enable Sound
Notice" and set proper notice sound parameters.
You may set Scheduler to beep, or you can set it to play some
music - midi file (".midi", ".mid", ".rmi") or
waveform (".wav"). If you have a sound card and attached
sound boxes to your computer, then playing a piece of music is fine, but if
you have no sound box or earphone, you can also choose "Beep",
99.9% of the personal computers are capable to beep as a basic built-in
function.
If
you don't like to hear beep or music at some time later, you can check on the
"Mute" option under "Sound" menu, and then all beeps or music
will be depressed.
4.4 Editing Schedule
The third page in the Task Editor can be used to edit schedules, the way how
Scheduler decides on a time to execute your task. There are 7 basic schedule types:
1)
Daily: run the schedule at the specified time (once or more than one times)
every day.
2)
Weekly: run the schedule at the specified time (once or more than one times)
every week.
3)
Monthly: run the schedule at the specified time (once or more than one
times) every month.
4)
Yearly: run the schedule at the specified time (once or more than one
times) every year.
5)
Once or Several Times: run the schedule at the specified time (once or
more than one times).
6)
Repeating: run the schedule at specified interval.
7)
Count Down: run the schedule after specified time delay counting from
now.
8)
At Logon: run the schedule when you log onto the system.
Except
for option 4 - "Once or Several Times" or option 6 - "Count
Down", you can also set a starting time and an optional ending time for
each schedule, the task will be executed only within specified starting time
and ending time.
The
above 7 schedule types haven't included all possible schedule types we required
in our life, but they are basic ones. You can combine these basic schedule types with
suitable setting in "Waiting Time" (see below) to realize
sophisticated scheduling requirements. More about this topic can be found at:
Examples and Tips in Using Scheduler PE
4.5 Handling Randomization
This function help you add uncertainty you may be interested in to an existing
schedule.
For
example, if you hope to design a schedule to be performed at a random time
between time X and Y, you can realize it by setting a schedule task which dues
at time X, and then you can enable Randomization and set a Random Period of
Y-X.
Enable
Randomization
Check
it if you want to enable randomization, uncheck it to disable the function.
Adjust
Period to be Valid
If
you check this option, you can only select a valid period before the next run and the end of this schedule
series.
If
you do not check this option, you may choose a randomization period as
long as 12000 hours (500 days). In this case, there is possibility that the final time
as the result of randomization is later than the next run or the end of this
schedule series, so this schedule can turn out to be an
"invalid" one which will never run. This is not a completely useless
design. It can decide the possibility that this task is performed at all. For example,
if you set the randomization design to be 3 times as long as the time between
start of the current schedule and the next one, then we get 1/3 possibility
that the task can perform between the two scheduled times, and 2/3 possibility
that the task may not perform at all.
If
the current schedule type is At Logon, then the Adjust Period to be Valid
option will be automatically disabled. This is because we cannot know when the
user will log onto the system in the next time.
When
to decide the final time?
You
can choose between "When the schedule time is set (earlier)." and
"When the scheduled time dues (later)". If you choose the first
option, the final time after randomization will be decided when this schedule
has been created, or when the current schedule is set.
If
you choose the second option, the final time will be decided only when the
schedule is due.
Final
Time
When
a final time has been decided, you can modify it by dragging the slider, or
click the "Modify" button to modify it.
Note:
1.
You cannot add randomization to an inactive schedule - a schedule already
stopped or disabled, so it has no further next run time.
4.6 Editing Waiting Time
Set a waiting time is important if you are not sure that your computer can be
running all the time. If your schedule unfortunately dues at a time when your
computer is not running, then how your schedule will act when you open your
computer next time will depend on how you set the waiting time for this
schedule.
There
are 3 types of waiting time. Here
are these waiting time types and instructions on how to use them:
|
Type of Waiting Time
|
Instructions
|
|
Don't wait
|
Select this option if you are sure there is
absolute no need to execute this schedule after the specified time.
|
|
Wait for some
time
|
Select this option if your schedule is
still meaningful to be executed at some later time, but not meaningful
any more
if really too late. You can set the waiting time to decide when is "too
late". If your computer is not running when the schedule dues,
it will still be executed instantly next time when you open your
computer, if it is still within the waiting time that you believe
is meaningful for your schedule to run.
|
|
Keep waiting
|
Select this if you believe this schedule
must be executed despite of any reason or how late it will be when you
open your computer next time.
|
Waiting
Timed can be combined with basic schedule types to realize
sophisticated scheduling requirements.
|